
When I first made the decision to carry, I thought qualifying for my concealed carry license was the big step. In reality, it was just the beginning. Over time, I learned that self-defense shooting isn’t about perfect scores on a static range—it’s about being prepared for the unpredictable. Through trial, error, and hours of training, I’ve built a routine of shooting exercises that keep me sharp, honest, and as ready as I can be for a situation I hope never happens.
Here’s what that training looks like.
1. Dry Fire: The Foundation of Carry Readiness
A valuable exercise that doesn’t involve a single live round. Dry fire has become a secret weapon, especially for concealed carry. A couple days out of the week, I take five to ten minutes to run through a few key drills.
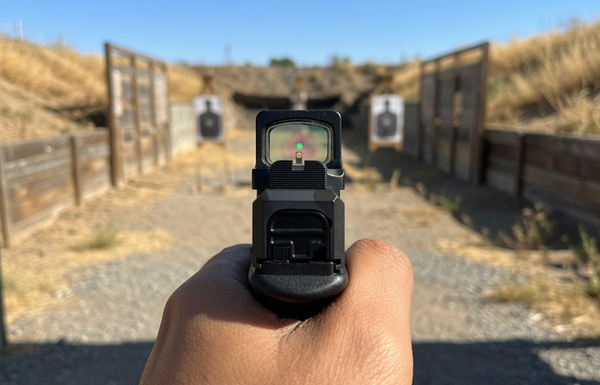
My favorite is the draw to first shot drill. I practice drawing from concealment (usually under a hoodie or T-shirt), establishing my grip, and driving the gun out to extension with proper sight alignment. No trigger press at first—just smooth, deliberate motion. Then I add a trigger press and focus on zero movement in the sights.
I can’t emphasize this enough: if you carry, you should know your draw like you know your heartbeat. Smooth is fast—but smooth only comes from reps.

2. The 3-Second Drill: Real-World Speed
In a real defensive encounter, time is a luxury you won’t have. That’s why it's called the 3-Second Drill. From concealment, you have three seconds to draw and put 2–3 rounds on a center-mass target at 5 to 7 yards.
The goal here is to balance speed and accuracy under pressure. Shot timers work great, but even a phone with a delay buzzer works in a pinch. At first you may barely beat the clock. But with time, you'll find that the draw, the presentation, and that critical first shot all will smooth out. This drill reminds me that defensive shooting is about controlled urgency—not panic.

3. Failure to Stop Drill (Mozambique)
Two shots to the body, one to the head. This classic drill reflects real-world scenarios where a threat may not go down with just a center-mass hit. Most run this at 5 and 7 yards, focusing on rapid sight picture acquisition and controlled recoil recovery.
When I first trained this drill, I found the head shot was often rushed and sloppy. It taught me a critical lesson: every shot counts. If I can't make a precision shot under stress, I’m not as ready as I thought. As you start practicing this, make sure you slow just enough after the body shots to place that head shot with intention.
4. One-Handed Shooting: Be Ready for the Worst
Life doesn't fight fair. You might be carrying groceries, shielding a loved one, or injured. That’s why strong-hand only and support-hand only shooting is important.
It’s uncomfortable and takes some getting used to. Your groups will suffer and speed will slow. But with time, one-handed control will improve. Building stability through solid wrist lock and a clean press is what makes it work.
I've also practiced one-handed draws and reloads using my belt or holster to rack the slide. These aren’t skills I want to use. But you train them because someday, you might have to.

5. Close Quarters Shooting (Retention Position)
Most civilian self-defense shootings happen at extremely close range—think 3 feet, not 30. That’s where retention shooting comes in. I practice drawing and firing from a compressed, close-to-body position—arm locked down, gun indexed slightly forward of my ribs.
It’s not about sighted fire here—it’s about controlling the gun and ensuring rounds go where they need to. Remember to train this with a focus on safety!
Close-quarters drills also emphasize awareness. Where’s my target? Are there bystanders? Do I move after the shot? The best gunfight is the one you don’t get into—but if it comes to you, you’d better be prepared to fight in extreme close proximities.
6. Movement and Use of Cover
Standing still in a fight can be a great way to get hurt. That’s why shooting while moving, and moving to cover is important. Basic barriers (like barrels or wooden walls), lateral steps, backward movement, and even kneeling positions behind simulated cover really help in training.
Shooting while moving is hard. Your accuracy drops fast. But that’s the point—to train under imperfect conditions.
Final Thoughts
Carrying concealed is not about being paranoid—it’s about being prepared. It’s not about being faster than anyone else—it’s about being competent when it matters most. I train not because I want to use my firearm, but because if I ever have to, I want to do so decisively, and effectively.
NOTE: We'd like to thank Luis Vidaurre @luishunting from Sheepdog Firearms Training for the GIFs shown on this blog and @guns_family_repeat for the main thumbnail photo.
Comments