So much attention is paid to range time, whether it’s plinking, drills, a day of recreating with friends or family, or competitive matches. Most people are quietly disappointed to find that their accuracy and speed aren’t what they were after a break of even two weeks after a good practice session. But that doesn’t need to be.
With good dry fire practice, you can be faster and more accurate on range outings and, more importantly, perform with competence if you must wield your firearm for defense. All that accomplishment is possible without investing an extra dime on ammo or gasoline to get to the range. So, in a way, dry fire is good for the environment!
Why, then, if dry fire really does work, do so few people take advantage of it? I believe the reasons are twofold. Dry fire requires a brief interruption of what for most people is a busy daily routine, filled with distractions both legitimate and contrived (you are reading online right now, after all, eh)? Second, and probably most influential, is that dry fire is decidedly un-sexy. If you’re willing to push through those perceived barriers, spending time on dry fire reaps sexy results from relatively little effort.
Be safe
SAFETY FIRST. Before starting any dry fire drill, the firearm must be cleared of all ammunition. This means, for semi-autos, remove the magazine, rack the slide, and check to ensure the chamber is clear. Ammunition should be in another room while dry firing indoors! Do not dry fire when under the influence of any substance, legal or otherwise.
Pick a small object of three inches or less as your dry fire shooting target—preferably at eye level and located against a wall made of heavy planks or bricks. The “target” should be from three to seven yards away when practicing for self-protection. Seven yards or 21 feet or less represents the vast majority of recorded self-defense shooting distances—not to mention most residential rooms simply place you closer. At least be sure there is no person nor animal in the adjoining room, and beyond if your walls are glass or drywall.
A three-step technique for dry fire training
- The drawstroke
While dry fire would seem to focus on the “fire” aspect, the drawstroke is equally important for fast and safe operation. This is especially true when the gun is concealed. With an empty gun, practice your drawstroke in front of a mirror. Be slow and deliberate at first. If you’re using the traditional five-step draw from an OWB hip-mounted holster, count out loud as you perform each step.
What you’re looking for in a great draw is:
- Safe and effective technique. None of your fingers should touch the trigger or trigger guard until your sights are on target. While it may be unavoidable with certain carry positions to not break the safety rule of not muzzling something you don’t want to destroy, there should be no muzzling of your non-shooting hand or arm. The same goes for re-holstering, by the way.
- Efficient motion. Imagine a laser tracking your hand on the gun during the draw. The image it produces should be one of just a few straight lines. If your draw entails lines that curve, dive, or wiggle, you’re wasting time. Generally, there should be one motion that breaks the gun free from the holster, one that orients the muzzle to face the target, and one that orients the sights to your line of vision. In close quarters, the third motion may be adapted or eliminated.
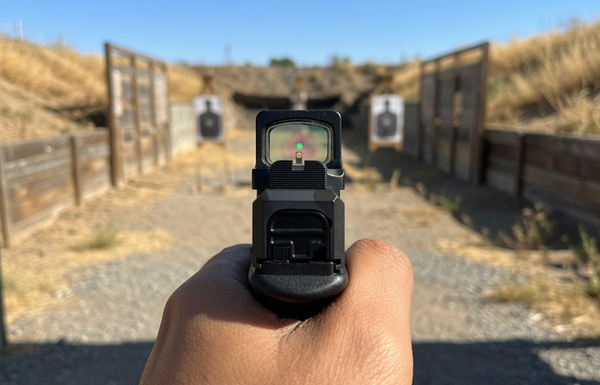
- Front sight focus
Most skills associated with good shooting are intuitive. This one isn’t. Practice drawing or presenting the gun on target rapidly, striving to obtain sight acquisition (aligned sights) and sight picture (sights superimposed on the desired point of impact) in quick succession.
Let’s take a moment to address sight acquisition Some new shooters misinterpret the forthcoming advice as meaning the rear sight can be completely ignored. Shooters with advanced shooting skills can indeed disregard the rear sight at close distances. If you’re not in that category, remember you must put both sights at eye level and gaze through the notch of the rear sight, striving to see a single straight line across the top of the sights, with equal daylight on both sides of the front sight post. If the aligned sights make the shape of a mountain or a valley rather than a plateau, your shot Is likely to land too high or too low, respectively.


With sights aligned, place the center of the front sight post exactly on the three-inch target. Now you have three choices of where to focus: rear sight, front sight, or target. Everyone’s natural inclination is to focus on the target. But if you want to become an accomplished shooter, focus on the front sight.
About the time you achieve a perfect sight picture, the sights will move. You’ll never stop this—it’s good to be a living, breathing human, eh? Don’t be tempted to solve the problem of sights that move in relation to the target by slamming on the trigger when you think it’s just right. Front sight focus is the solution.
Notice I haven’t said whether to keep both eyes open or close your non-dominant eye. For now, and maybe throughout your shooting career, just do whatever you feel best doing.
- Trigger control perfection
There are lots of triggers out there, each with its own best technique for precision shooting (as opposed to combat or speed shooting). Regardless of the type of firearm, the goal of good dry fire is the same as live fire: keep the front sight on the target until the shot is history. It’s simple! It’s just not easy—but with good dry fire practice, it’ll become so.
Your trigger press should go all the way to the “click” that would be a “bang” with a loaded gun. Modern firearms bear no damage from dry fire practice, but if it makes you feel better, get some dummy rounds called snap caps. They’re more durable than plastic dummy rounds and give your striker or firing pin something to strike.
Unless your firearm is double action only, you’ll need to manually reset (“rack”) the slide or, for single-action revolvers, cock the hammer every time you pull the trigger.
A good trigger press means adding finger pressure straight back on the trigger until the gun goes click or bang. I often tell students to add the weight of one quarter (as in the coin) to their press until that happens---in other words, don’t make the click happen, let it happen. Depending on your trigger, maybe envisioning the weight of a dime is more appropriate.
Another version of this method was seen at the pistol class I attended with Kyle Defoor of Defoor Performance Shooting. Taking the slack or free travel out of a Glock trigger, until his finger was at the “wall,” he said, “this is 50 percent.” Then, adding weight to his trigger pull gradually and counting aloud, “55 percent, 60 percent, 65, 70…” and somewhere around 70 the shot happened.
Putting it all together
Strive to keep your sights on target until that “click” that would be a shot is history, and you will experience dry fire success and later, shooting success. Add these steps together over time, seeing how fast you can draw, see the sights on target with the front sight in focus, and press the trigger to “click” without the sight dipping (the most common error) or flipping upward.
It only takes five minutes of practice, several nights per week, to become a much better shooter using dry fire—with not a dime spent on ammo! The procedures described here also make a great warm-up to get to most out of your range time. When these steps are combined as a package and practiced safely, dry fire is the ticket to great performance both in competition and for self-protection.
Gun safety is your responsibility. Neither Bravo Concealment nor the author bear any liability for unintended or negligent discharge of a firearm not in our hands.

Eve Flanigan is a defensive shooting and concealed carry instructor living in the American Southwest. Today she works full time as an instructor and writer in the gun industry. Flanigan loves helping new and old shooters alike to develop the skills needed to keep themselves and their loved ones safe.

Comments