25% OFF ON LINKED IWB GUN HOLSTER FOR A LIMITED TIME

Three Ready-Gun Positions You Should Know

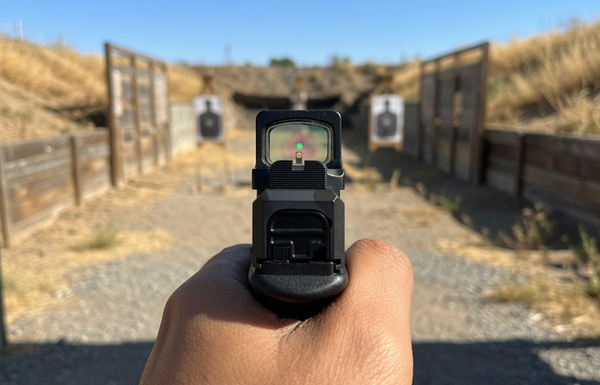
The gun in your hands should be held both safely and ready for action.

If you’re practicing on an open range with a gun you don’t have a holster to fit, or if you’re going to fire after drawing but there’s a delay in the action, or if you unholster your gun in anticipation of using it in self-defense, you need to handle the gun in a manner that’s safe as well as useful for the situation. The three techniques are my go-to solutions for those moments. I hope you’ll try them out for yourself and make them part of your gun-handling toolkit.

A common source of firearm injury to the self is a round through the foot from holding the gun in one hand, mindlessly allowing the muzzle to cover the foot while the trigger finger (or even other fingers) are inside the trigger guard. That injury—and the permanent disability that follows—are avoidable by keeping in mind these rules:

  •  
  • - Every gun is always loaded (treat it as such even when you know or someone told you it’s not).
  • - Never allow the muzzle to cover anything you’re not willing to destroy.
  • - Finger(s) off trigger (and clear of the trigger guard) unless the sights are on target and you’ve made the decision to fire.
  •  

It’s simple—but I see these rules broken with great regularity. So let’s replace them with actual SKILL that can serve you defensively as well.  Learn and practice these three so-called ready positions.

For every one of these, the gun is held in a “firing grip” in your primary shooting hand. That means the gun is held with the “V” of your thumb and forefinger as high as they can go on the back of the grip, the pinky, ring, and middle fingers are wrapped firmly around the grip, and the trigger finger is planted flat along the slide or cylinder.

Gripping the gun in this manner is not only safe, it’s the fastest way to start shooting if you need to. I’ve said it in other places on this blog, but it bears repeating:  make this the only way you hold the gun, so much that holding it in any other manner feels awkward.

Using the support-side hand will come into play for each of these techniques. Some blanket rules apply. Unless you’re a revolver shooter and your support hand thumb goes behind the gun, on top of your firing hand, when you shoot, never allow the support side thumb to go behind the gun. Likewise, don’t get in the habit of gripping the wrist/forearm of the hand that holds the gun with your support side hand. What you do in your casual moments is what you’ll do in a gunfight. Both of these incorrect uses of your support side hand can cause serious interference with gun function and the accuracy of your shooting.


  1. 1. Low Ready

With the gun in a firing grip, including the support hand, simply rest your upper arms against your chest. The muzzle will point to the ground about a foot in front of you. This is a great position when you must wait patiently with gun in hand. Unlike holding the gun in one hand only, low ready will prevent you from absentmindedly muzzling your own foot. You can stay in low ready for as long as necessary with no undue fatigue.


  1. 2. Compressed Ready  

With the gun in a firing grip, including the support hand, bend the elbows, bringing the gun close to your midsection with the muzzle pointing straight ahead. Compressed ready is my go-to position for visually searching my environment after engaging targets. While I get my mind woken up to what’s going on around me, the gun is less visible and harder to wrest from my grip as compared to being in a firing position or even low ready. It is possible to shoot from compressed ready, though if your semiauto is too close to your chest or if your wrist joints aren’t held ridged, a malfunction may result after the first shot.


  1. 3. Sul

Sul means “south” in Portuguese. And “south,” as in straight at the ground between your feet, is where the muzzle should point in this position. It is a little more complicated to learn than low or compressed ready, but imminently worthwhile.

From the firing position, press the narrow sides of the thumbs into one another, making them work as a hinge of sorts as you also bend the elbows, bringing the gun to your chest or perhaps lower on your midsection. About halfway through that motion, the four fingers of the support hand break away from the grip of the gun and the support hand is pressed into the body with the palm side facing you. The primary side hand maintains a firing grip while the wrist of that side cocks downward. The muzzle is pressed vertically toward the ground; the frame of the gun is pressed gently against the backside of the support hand. The thumb are steepled up toward the chin. Return to the firing position by keeping the thumbs together. The gun will naturally “roll” into place, pointing downrange.

Using Sul does require a proper grip to begin with---no “teacupping” with the support hand and a firing hand that’ placed as described at the beginning of this article.

This is a favorite tool of mine for concealed carry, and one that I personally know has been used to positive effect when a law enforcement friend, who was off duty at the time, drew his gun near the entrance of a store, where the usual crowd was attentive to the spectacle of a parking lot fist fight that escalated to a gun being retrieved from a car. The officer quickly realized that a bystander who spotted his gun might panic, thinking he was part of the problem. Fortunately, his open jacket provided good visual cover for the gun as he approached the scene.

Especially for anyone carrying in a purse or holster that forces a cross-body draw, Sul is essential for avoidance of muzzling the brachial artery of your support side, not to mention anyone in that 90-degree radius between your muzzle clearing the holster and facing the target or threat.

Sul is also a good off-range technique in that one can turn any direction and not muzzle anyone unless there is a downstairs level. It’s quick to get into and out of, with practice, in comparison to the other two methods here. It also makes stealing your gun a task suited only to the most observant and determined of assailants.

The most common errors when learning Sul are not bending the wrist enough to achieve vertical positioning of the muzzle---thus muzzling one’s own support side foot. Some people tend to stick their elbows out when learning Sul, which negates the subtle appearance of this technique.

Make These Your Own

Keep in mind, the names of these positions are arbitrary. Other instructors may use different terms for the same skills. You could name them Giuseppe, Maria, and Franco for all I care. What matters is that you make use of them.

I use all three of these techniques on the regular. Master one at a time, using an unloaded gun at first, and you soon will find yourself a safer, more competent gun handler. Never forget it’s not necessarily marksmanship, but good gun handling that wins gunfights! Do not hesitate to practice and claim these three skills as your own.


Eve Flanigan is a defensive shooting and concealed carry instructor living in the American Southwest. Today she works full time as an instructor and writer in the gun industry. Flanigan loves helping new and old shooters alike to develop the skills needed to keep themselves and their loved ones safe.

Leave a comment

Please note, comments must be approved before they are published

More From Training

Get the Latest Updates

Get Your FREE Video - "EDC All Day / Every Day"