In Your Sights: Two Fundamentals of Marksmanship
In this edition of a series of articles on the Seven Fundamentals of Marksmanship, we examine those involving sights: sight alignment and sight picture. While I have previously addressed this matter in a manner appropriate for the intermediate shooter or someone with at least basic competency as a shooter, in terms of promoting use of the front sight as a focal point, this article addresses the basics: What is sight alignment? What is sight picture? And of course: How do I apply these with a gun in my hands?
ICYMI: The 7 Fundamentals of Marksmanship
- Stance
- Grip
- Sight Picture
- Sight Alignment
- Breath
- Trigger Control
- Follow Through
Sight Alignment
means the relationship of the rear and front sights. For the majority of practice, aligning the sights entails raising the gun so that the notch of the rear sight is at eye level. Looking through the notch, see the front sight post. Strive to position the rear and front sights so you see equal strips of daylight between each side of the front sight as viewed through the rear sight notch. Then seek to establish equal height of the rear and front sights. The shape they produce should be one smooth line, usually a flat line like a plateau or mesa. If the height of the front sight would make a mountain-shaped outline if you drew an imaginary line around them, the front sight is too high, and your shot will also land high. If the shape of the rear/front sight alignment looks more like a valley, shots will go low.
Remember the short rhyme, “equal height, equal light,” when aligning the sights.
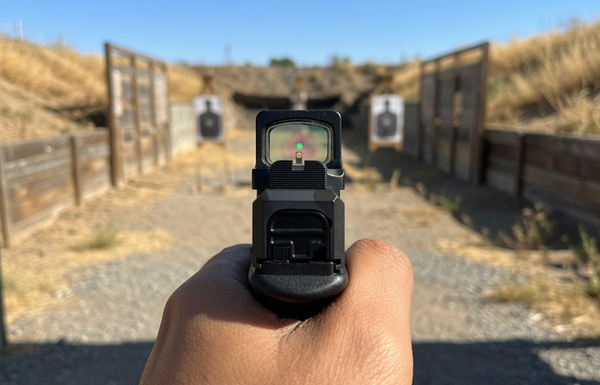
If you’re using a red dot optic, sight alignment is something you can ignore so long as the sight is operating correctly. But in case the battery dies or the sight doesn’t work for some other reason, it’s good to have the ability to see and use traditional sights on your gun.
Sight Picture
means imposing the aligned front and rear sights onto the target. For defensive shooting, that generally means centering the topline of the sights on the middle of the target.
For people shooting at a torso-like target that’s facing them, It’s common to choose a point at the center of the upper third of the target to accommodate the fact that, sooner or later, everyone has a shot go low due to jerking the trigger thanks to feeling rushed or anticipating recoil. When shooting small targets at distance, it is often necessary to use a “six o’clock hold” on the target, meaning the sight picture will entail putting the target on top of the aligned sights much like a lollipop on a stick. This serves to keep a small target visible and not covered by the sights, as well as to accommodate for the arc of travel of the bullet. The bullet will be higher at, say, 25 yards than it is when it leaves the muzzle.
Is it ever appropriate to use “Kentucky windage” because point of impact doesn’t equal point of aim? Generally speaking, no, since it’s almost guaranteed that you’re never going to think of making that adjustment in true defensive shooting. Often errant shot groups are the result of imperfections in other fundamentals, specifically trigger press or grip. But if those are in good shape, a sight adjustment may be in order.
There are exceptions. If shots are going consistently left or right, assuming your finger is pressing the trigger straight back with no sideways influence, and you’re not making major grip errors, it may be time for a sight adjustment. On many handguns, only the rear sight is adjustable. It should be carefully moved in the direction that the shot group should go. For example, if the shot groups are too far right, the rear sight should be pushed left, as viewed from the shooter’s perspective.
Add the Magic
So you’ve got equal-height front and rear sights, with the front sight centered so there’s equal light visible on each side of the front sight. Your sights are centered on the target, you’re making no huge errors with the trigger, and your shot groups are looking pretty good. An example of “pretty good” is a five-inch group fired from five to seven yards. Most people feel satisfied with getting this far, call themselves an acceptably good shooter, and stop right there. But you can do better, and it’s relatively simple. Not to mention that, if the day comes when you do have to fire rounds in self-defense, your accuracy will almost surely decrease in a dynamic, hurried situation. Or maybe you must take time and take a precision shot or no shot at all, perhaps because your assailant is partially obscured behind some innocent person—maybe someone you love. So it’s worth pressing on with your ability to place shots in a tight, tight group. If you can do so, It means you have the ability to repeat the task of making a precision shot. But how do you go from producing groups that look like the first random drops of rain on a sidewalk to drilling one ragged hole in the paper?
The main technique for improving accuracy and making sight picture your own is to develop the habit of focusing on the front sight, though your gut is going to nudge you to look at the target. I’ve discussed that in depth in a previous article.
The other hint to master the challenge of making smaller groups is to ignore the movement that your body inevitably puts on the gun. If you stand quietly and watch your front sight, you’ll probably notice that you’re involuntarily making the gun travel minutely, but visibly, in loops shaped something like a figure 8, laying on its side and with loops like partially flattened ovals. Ignore this and trust that, if you focus on keeping the front sight where it belongs, the shots will go where you want them. For pistol shooting, do not try to time your trigger presses to coincide with the arc of movement crossing the target. Doing so will result in a rushed shot that will most likely land lower than desired.
To put all this in very simple terms, the shot will go where the front sight appears on target. Where the front sight is in relation to the rear sight matters, especially for beginners and especially at longer distances regardless of skill level. This fundamental is also affected by another fundamental, follow through, which will be addressed in a later article.
When I conduct live classes, people often confuse the Seven Fundamentals of Shooting with the Four Rules of Firearm Safety. They are not the same. The safety rules should be followed as anyone handles a gun. The Seven Fundamentals are the way the gun is best operated.
If we look at shooting as a martial art, the Four Rules, the Seven Fundamentals, and a proper mindset for the preservation of self and family are the triune that form The Way of the Gun. Here, we take a general overview of the Fundamentals aspect of that trio. Later articles, and in one case a previous one on trigger control, will address them from a how-to perspective.
Comments