
Tricking Out Your Gun: My Journey into Firearm Customization
There’s something personal about a firearm. For some, it’s just a tool. For me, it’s more than just a tool—it’s something I want to feel completely comfortable with, tailored to how I shoot, and how I carry.
The first time I held my stock Glock 19, I appreciated the engineering. Solid, reliable, no-nonsense. But it didn’t take long before I started wondering: What if I changed this? Could I make it better for me? That curiosity opened the door to the world of firearm customization.
Let me be clear: customization isn’t just about looks. Sure, there’s nothing wrong with a firearm that turns heads at the range, but for me, upgrades need to serve a purpose—whether it’s comfort, control, speed, or accuracy. My goal was to build something that felt like an extension of my body.
Step 1: Define the Mission
Before I touched a single screw or swapped a single part, I had to figure out what this gun was for. Was it going to be my everyday carry? A home defense tool? A range workhorse? Each role has different priorities.
My first project gun was primarily for home defense and range work—so I had a little more flexibility than I would with a concealed carry piece. That mission statement guided every decision from that point on.

Step 2: Grips and Ergonomics
One of the most noticeable upgrades you can make is to the grip. Most polymer pistols come with decent texturing, but under stress or after extended shooting, “decent” may not be enough.
I started with grip tape. But eventually, I went all-in and got the frame stippled. The result? A grip that locks into my hand and doesn’t shift no matter how sweaty or fast things get. It made a real difference in my control and consistency.

Step 3: Sights and Optics
Factory sights sometimes can be the weakest links on a handgun. That was one of the first things I replaced. I went with a high-contrast night sight set—easy to pick up in daylight or low light, with a bright front dot that made fast targeting a breeze.
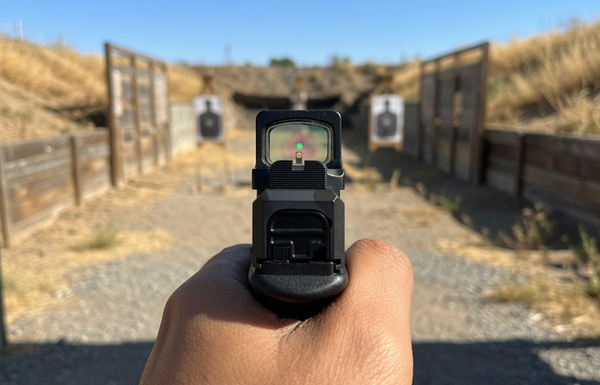
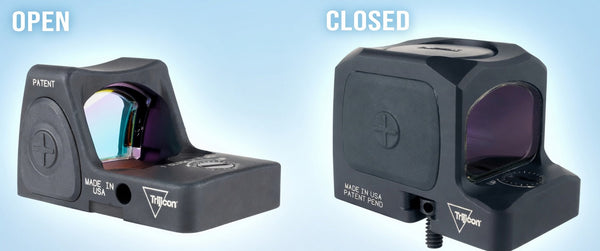
Later, I made the jump to a red dot—specifically a Trijicon RMR. I’ll admit, there was a learning curve. But once I got used to it, the benefits were undeniable: quicker follow-ups, better performance at distance, and a huge boost in confidence.

Step 4: Trigger Upgrade
Let’s talk about triggers. The factory trigger on my Glock was fine—but “fine” wasn’t what I was after. I swapped in a flat-faced aftermarket trigger with a cleaner break and shorter reset.
The difference was instant. I was shooting faster with more control, and I could feel the improvement in every shot. Just remember: don’t chase feel at the expense of reliability. Choose a reputable brand, and test it thoroughly.

Step 5: Weapon Light
Adding a weapon-mounted light was one of the most practical decisions I made. I went with a SureFire X300—built like a tank, with a powerful output. Being able to clearly identify threats in low light is not just helpful—it’s essential.
One thing though, if you’re going to run a light, train with it. A gun with a bunch of gadgets you’re not confident using is a liability, not an asset.

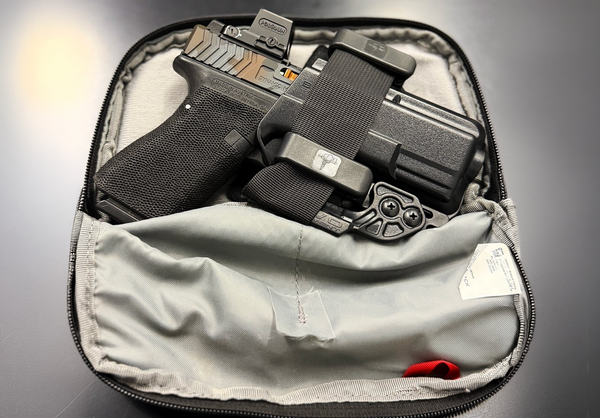
Step 6: Holsters and Compatibility
Once I had a red dot, light, and upgraded controls, I had to get the proper holster. I'm fortunate to have access to holsters that accommodate popular weapon lights and red dot options. You may have to rethink this though. Most off-the-shelf holsters don’t accommodate all those additions. Check out Bravo's "Search By Gun" page to see if we offer a holster for your tricked-out gun.
Don’t underestimate how much a good holster matters. A great build is only as useful as your ability to carry or deploy it safely and efficiently.
Step 7: Internal Components
This part gets controversial. Swapping out barrels, guide rods, or springs can definitely improve performance—but it can also introduce reliability issues if done incorrectly.
I upgraded to a match-grade barrel and polished some internals, which smoothed out the action. But I avoided messing with spring weights or striker assemblies too much—I didn’t want to compromise reliability, especially in a defensive firearm.
What I Learned
Customizing my firearm wasn’t just about building a “cool” gun. It forced me to think critically about how I shoot, what I need, and where my gear might be holding me back. Every upgrade added capability—but also required a bit more training. A better gun won’t make you a better shooter unless you put in the time to learn it.
Would I do it again? Sure. Even though nowadays you can get a custom made, modded handgun already built for you.
So if you’re thinking about customizing your firearm, go for it. Just do it intentionally. Know your goals, understand the trade-offs, and most importantly—test everything. At the end of the day, your gun should work for you, not the other way around.
Comments